Wifi connected but no internet access
Wifi network errors are quite a common problem these days. There could be a lot of reasons as to why your device is connected but you might not be able to access anything on the internet. This error is generally highlighted using a yellow triangle followed by a black exclamation mark on your devices. However, most of these errors are trivial and can be fixed by some simple troubleshooting. The following article show you various techniques to fix the "Wifi connected but no internet access" issue on your Windows 11 /Windows 10/Android PC.
Firstly, you should check whether it's just one device or multiple devices experiencing the same problem. If the problem is with multiple devices, the cause may be related to one of the following:
- Problem with your Router or modem
- Wireless network Problem
- ISP is down
It's only a single device that gets the error stating that it has wifi connected but cannot connect to the internet, you can follow these quick remedies, which might be effective in solving your internet connection problems.
Reboot your PC
Before trying out the other solutions, you can try rebooting your PC to see if it helps to rectify this problem. Rebooting your PC will close all the apps and processes running in the background and prevent them from interfering with the Windows 11 operations.
Remove and reinstall the driver
It's better you to create a restore point before you proceed with this steps.
- Press Windows + X key and select Device Manager from the context menu.
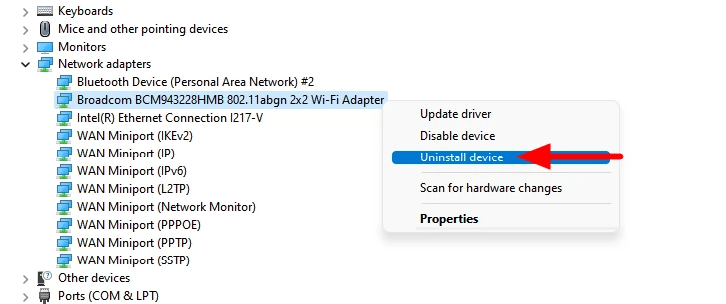
- Spot and expand the Network adapters.
- Right click on the Wi-Fi driver and select "Uninstall".

- Check the box beside "Delete the driver software for this device".
- Then download and install the latest version of the driver again from Manufacturer website.
Change the wireless mode from 802.11ax to 802.11ac
In some cases changing the wireless mode from 802.11ax to 802.11ac to fix this issue. IEEE 802.11ax, officially marketed by the Wi-Fi Alliance as Wi-Fi 6 (2.4 GHz and 5 GHz)and Wi-Fi 6E (6 GHz), is an IEEE standard for wireless local-area networks (WLANs) and the successor of 802.11ac.
- Click the Search icon/magnifying glass.
- Type "control panel".
- Click "Device Manager".
- Go down to "Network Adapters" and expand that section.
- Highlight and double click on your wi-fi adapter.
- Click the "Advanced" tab.
- Change the wireless mode from 802.11ax to 802.11ac, reboot and see if it changes from "Connected, No Internet" to just Connected (with internet).
Disable Windows Firewall
If you have the firewall configured on a third-party antivirus , you must first disable it as may conflict with the Windows Firewall. This can be done via the built-in app settings.
Enable and Disable Airplane Mode

- To enable airplane mode, click on the 'Action Center' icon in the Taskbar or press WINDOWS + A to access the Quick Settings.
- Next, click on the 'Airplane mode' tile to enable it. Once it's enabled, the color of the tile will change from white to blue.
- Wait for a minute and again click on the 'Airplane mode' tile to disable it.
- After disabling the 'Airplane mode' check if you are able to connect to the network and access the Internet.