Basic structure of an HTML document
The basic structure of an HTML page consists of two main sections: the head section and the body section.
The head section contains information about the document, such as the document title, author, and metadata. It is not displayed on the page itself, but is used to provide information to the browser and search engines.
The body section contains the content of the document, such as text, images, and links. This is the part of the document that is displayed on the page itself.
It is important to note that every HTML document should begin with a <!DOCTYPE html> declaration to specify the document type, followed by the <html> element as the root element of the document. The head and body sections should then be nested inside the <html> element.
Purpose of the <header> tag in an HTML page
The <header> tag is an HTML element used to define the header of a section or page. Its purpose is to provide a container for introductory or navigational content at the top of the document.
The <header> tag is typically used to contain elements such as logos, headings, navigation menus, search bars, and other introductory or branding elements. It is also commonly used to provide a consistent and recognizable design element across pages within a website.
The content within the <header> tag is typically placed at the top of the page, and may span the entire width of the page or be contained within a narrower container. The <header> tag can be used multiple times within an HTML document, such as to define headers for different sections of the page.
Purpose of the <body> tag in an HTML page
The <body> tag is an HTML element used to define the main content of a web page. Its purpose is to provide a container for all visible content on the page, such as text, images, videos, and other multimedia elements.
The content within the <body> tag is what is displayed to users when they visit the webpage. This content is typically organized into various sections and subsections using HTML tags such as headings (<h1>, <h2>, etc.), paragraphs (<p>), lists (<ul>, <ol>, <dl>), and more.
The <body> tag can also contain other HTML elements such as forms (<form>), tables (<table>), and multimedia elements such as audio and video (<audio>, <video>). Additionally, the <body> tag can be used in conjunction with CSS styles to define the layout and style of the page content.
Opening tag and closing tag
In HTML, an element is defined by its opening tag and its closing tag. The opening tag is used to start the element, and the closing tag is used to end it. The content between the tags is the content of the element. Here's an example of how opening and closing tags work:
In the above example, the <p> tag is the opening tag, and the </p> tag is the closing tag. The content between the tags is "This is a paragraph." The opening tag is always the name of the element wrapped in angle brackets, and the closing tag is the same as the opening tag, but with a forward slash before the element name.
In HTML, some elements are self-closing, meaning they don't require a closing tag. These elements are written with only one tag, and a forward slash before the closing angle bracket. Here's an example:
In the above example, the <img> tag is a self-closing tag. The src attribute specifies the source of the image, and the alt attribute provides alternative text for the image.
It's important to remember that every opening tag should have a corresponding closing tag, and the tags should be properly nested within each other. This is important for the browser to properly interpret the HTML code and display the content correctly.
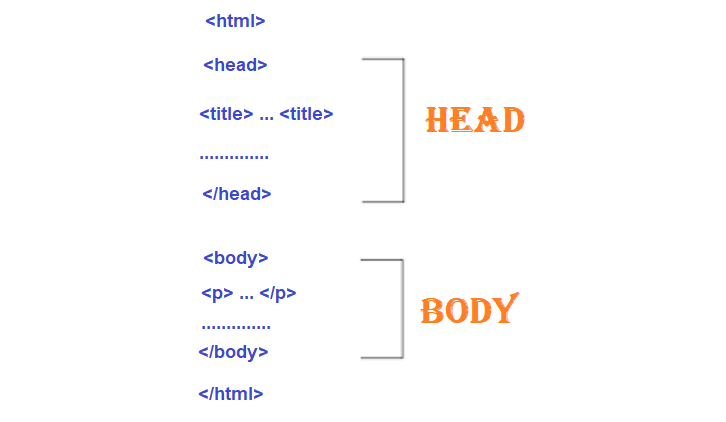
HTML Page structure
The basic structure of an HTML page consists of two main sections: the head section and the body section. The head section contains information about the document, such as the document title, author, and metadata. The body section contains the content of the document, such as text, images, and links.
Following is an example of an HTML page with its various elements:
 Browser View
Let's break down the different elements used in this example:
- <!DOCTYPE html> declares the document type and is required at the beginning of an HTML document.
- <html> is the root element of an HTML document and contains all other elements.
- <head> contains information about the document and is not displayed on the page itself.
- <meta charset="UTF-8"> declares the character encoding of the document to be UTF-8.
- <title> sets the title of the document, which is displayed in the browser's title bar.
- <link rel="stylesheet" href="style.css"> links to an external stylesheet called "style.css" that contains CSS code for styling the page.
- <body> contains the content of the document that is displayed on the page.
- <header> contains the header section of the page, which typically includes the page title and navigation menu.
- <h1> is a heading element that sets the main title of the page.
- <nav> contains the navigation menu for the page.
- <ul> creates an unordered list of links in the navigation menu.
- <li> creates a list item in the unordered list.
- <a> creates a hyperlink to another page or resource.
- <main> contains the main content of the page.
- <section> groups related content together within the main content area.
- <h2> is a subheading element that sets the title of each section.
- <p> creates a paragraph of text.
- <footer> contains the footer section of the page, which typically includes copyright information and other legal information.
Hyperlink in an HTML page
A hyperlink in an HTML page is a clickable link that takes the user to another location within the same page or to a different web page. Hyperlinks are created using the <a> tag, which stands for "anchor".
The basic syntax for creating a hyperlink is as follows:
The href attribute specifies the destination URL of the link, and the link text is the text that appears on the page and is clickable.
For example, to create a hyperlink to the Google website, you would use the following code:
When the user clicks on the link, their browser will load the Google website.
In addition to linking to external websites, hyperlinks can also be used to link to other pages within the same website. In this case, the href attribute would specify the relative path to the destination page.
Hyperlinks can also be used to link to specific sections within a page. To do this, the href attribute would specify an internal anchor ID using the # symbol followed by the ID of the target element. For example, to create a hyperlink to a specific section with an ID of "section1", you would use the following code:
When the user clicks on the link, their browser will scroll to the section of the page with an ID of "section1".
Purpose of the ‹img› tag in an HTML page
The <img> tag is an HTML element used to embed images into a web page. Its purpose is to display images to users, making web pages more visually appealing and engaging.
The <img> tag requires a src attribute to specify the URL of the image to be displayed. Additionally, it can have optional attributes such as alt, width, height, and title.
The alt attribute provides alternative text for the image, which is displayed when the image cannot be loaded or is not available. This is important for accessibility reasons, as it enables visually-impaired users to understand the content of the page.
The width and height attributes specify the dimensions of the image in pixels. This is useful for ensuring that the image displays correctly on different devices and screen sizes.
The title attribute provides additional information about the image, which can be displayed as a tooltip when the user hovers their cursor over the image.
For example, to embed an image of a cat into a web page, you could use the following code:
When the page loads, the image would be displayed with a width of 500 pixels, a height of 400 pixels, and a title of "Photo of a cute cat". If the image is not available or cannot be loaded, the alt text "A cute cat" would be displayed instead.