Exception Handling in Java
An exception in programming serves as a representation of a runtime error that disrupts the typical execution flow of a program. It acts as a mechanism to handle unforeseen circumstances or exceptional situations that arise during program execution, allowing control to be transferred from one part of the code to another.
When an exception occurs, it triggers an interruption in the normal sequence of instructions being executed. This interruption allows the program to deviate from its regular path and transfer control to a designated exception-handling mechanism or block of code. By doing so, developers can handle the exceptional condition and take appropriate actions to mitigate the error.
Exceptions provide a structured approach to deal with exceptional scenarios, making code more robust and fault-tolerant. They enable the separation of regular code logic from error handling logic, improving code readability and maintainability. Exception handling allows for the recovery from errors and facilitates appropriate error reporting or logging.
Types of Java Exceptions
There are two main types of exceptions in Java:
- Checked exceptions
- Unchecked exceptions
Checked Exceptions:
Checked exceptions are exceptions that are checked at compile tim e and must be either caught or declared in the method signature using the throws keyword. Examples of checked exceptions include FileNotFoundException, IOException, and SQLException.
Unchecked Exceptions:
Unchecked exceptions, also known as runtime exceptions, are exceptions that are not checked at compile time and do not need to be caught or declared. Examples of unchecked exceptions include NullPointerException, IndexOutOfBoundsException, and ArithmeticException.
It's important to note that checked exceptions are meant to represent situations that can be handled by the program, such as missing files or invalid user input. Unchecked exceptions, on the other hand, are meant to represent programming errors, such as null pointers and divide-by-zero errors.
Exception handling in Java
Exception handling is a mechanism in Java that enables the program to handle runtime errors, such as division by zero, array index out of bounds, and so on. The purpose of exception handling is to provide a way for the program to recover from these errors and continue executing, instead of abruptly terminating.
How to exception handling works in Java
Try-Catch:The try-catch block serves as the primary mechanism for handling exceptions. It provides a structured approach to handle potential exceptions that may occur during the execution of a block of code.
The try block encapsulates the code segment where an exception might be thrown. This code segment is where developers place the potentially risky or error-prone code that could result in an exception.
On the other hand, the catch block is responsible for handling the exception that was thrown within the corresponding try block. The catch block specifies the type of exception it can handle, and if an exception of that type occurs, the code within the catch block is executed. It allows developers to define the specific actions or alternative code to be executed when an exception is encountered. The syntax is as follows:
An exception is thrown by using the Java throw keyword.
The finally block serves as an optional but valuable component in exception handling. It is utilized to ensure that specific code is executed, regardless of whether an exception is thrown or not, guaranteeing that crucial operations are performed regardless of the program's flow.
The finally block is executed after the completion of the try block and any associated catch blocks. It acts as a finalization stage, allowing developers to include code that must be executed regardless of whether an exception occurred during the execution of the try block.
Syntax:The Exception Hierarchy:
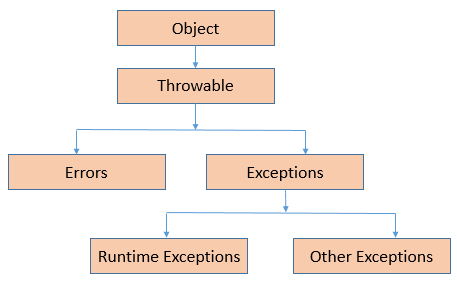
Java provides a hierarchy of exceptions that inherit from the java.lang.Exception class. When an exception is thrown, the Java runtime searches the catch blocks in the order they appear to find the first one that can handle the exception. The catch block must handle the exact type of exception that was thrown, or a superclass of that exception.
How to Catch multiple exceptions in Java
You can catch multiple exceptions in Java using multiple catch blocks. Each catch block must handle a different type of exception, and the catch blocks must be listed in the order from the most specific exception type to the most general exception type.
In the above example, the code inside the try block might throw a FileNotFoundException, an IOException, or any other exception. The first catch block catches FileNotFoundException and handles it. If the exception thrown is not a FileNotFoundException, the next catch block is checked, and so on. The last catch block catches any exception that was not caught by the previous catch blocks.
It's important to note that the catch blocks must be ordered from most specific to most general, as the Java runtime checks each catch block in the order in which they appear. If a catch block for a more general exception type appears before a catch block for a more pecific exception type, s the more specific exception will never be caught.
throws keyword
Additionally, you can use the throws keyword in the method signature to declare that a method might throw an exception. This makes it easier for other code that calls the method to handle the exception appropriately.
In the above example, the readFile method declares that it might throw both a FileNotFoundException and an IOException, so code that calls this method must either handle the exceptions or declare that it also throws the exceptions.
Custom Exceptions:
In addition to the built-in exceptions, you can create custom exceptions by defining a class that extends the java.lang.Exception or java.lang.RuntimeException class. This allows you to specify the type of exceptions that your code might throw, and enables others who use your code to handle those exceptions in a specific way.
In the above example, CustomException extends the Exception class and provides a constructor that accepts an error message. The serialVersionUID is a version identifier for the serialization of the object.
You can use the custom exception in your code as follows:
In the above example, the checkVal method throws the CustomException if the value is less than 200. The main method calls the checkVal method and catches the exception if it is thrown. The error message is then printed using the getMessage method of the exception.
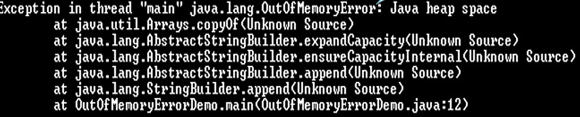
What is printStackTrace()
The printStackTrace() method is a method of the java.lang.Throwable class, which is the parent class of all exceptions and errors in Java. This method is used to print the stack trace of an exception, which provides information about where the exception occurred and what caused it.
The stack trace is a list of method calls that were made leading up to the point where the exception was thrown. Each entry in the stack trace includes the name of the class and method where the exception occurred, as well as the line number. This information can be useful for debugging the cause of the exception and for fixing the issue.
In the above example, the code inside the try block might throw an exception. If an exception is thrown, it is caught by the catch block and the stack trace of the exception is printed using the printStackTrace() method. This makes it easier to see where the exception occurred and what caused it, so you can fix the issue.
It's worth noting that printStackTrace() is usually used for debugging purposes and is not recommended for production code, as it provides detailed information about the inner workings of your program that might not be appropriate for end users to see. Instead, you might want to log the exception or display a more user-friendly error message to the end user.
Advantages of Exception Handling in Java
Exception handling is a crucial aspect of Java programming, and it offers several advantages, including:
- Improved error handling: Exception handling makes it possible to handle errors and unexpected situations in a controlled manner, so your program can continue to run even if there are problems.
- Increased reliability: By handling exceptions properly, you can prevent your program from crashing or producing incorrect results in the event of an error. This leads to more reliable and robust programs.
- Better program structure: Exception handling can help to make your code cleaner and more organized, as error handling logic is separated from the rest of your code.
- Increased separation of concerns: Exception handling allows you to handle different types of exceptions in different ways, so you can provide more specific error messages and take different actions based on the type of exception that has been thrown.
- Improved maintainability: By using exception handling, you can write code that is easier to maintain, as error handling logic is centralized in one place and can be modified or extended as needed.
- Easier debugging: By using exception handling, you can make it easier to debug your code, as exceptions provide a clear indication of where the problem occurred and what type of error has occurred.
- Improved program flow: Exception handling makes it possible to control the flow of a program even when an error occurs, so your program can continue to run and produce meaningful results.
By taking advantage of the benefits of exception handling in Java, you can write code that is more reliable, maintainable, and easier to debug.
Conclusion:
Exception handling is an important aspect of writing robust, production-ready code in Java. By using the try-catch block, the finally block, and custom exceptions, you can write code that can recover from errors and continue executing.