Timer Control - VB.Net
The Timer Control holds significant significance in both client-side and server-side programming, as well as its application in Windows Services. This versatile control enables precise control over the timing of actions without the need for concurrent thread interaction. It allows you to execute a piece of code repeatedly at a predefined interval. Here's a detailed explanation of how it works:
What it does:
- The Timer control generates an event at a specific time interval you set.
- This event triggers the execution of code you define in an event handler function.

Key Properties:
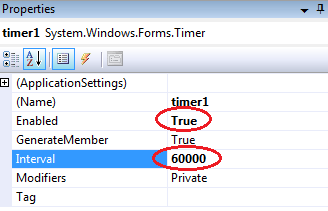
- Interval (Integer): This property determines the time gap between events in milliseconds (ms). For example, an interval of 1000 milliseconds triggers the event every second.
- Enabled (Boolean): This property controls whether the timer is actively counting. Setting it to True starts the timer, and False pauses it.
Events:
- Tick (Timer): This is the core event fired every time the interval elapses. Your code to be executed periodically goes inside the Tick event handler function.

Using the Timer Control:
- Add the Timer control: In the toolbox of your Visual Studio project, find the Timer control and drag it onto your form.
- Set the Interval: In the properties window, adjust the Interval property to your desired time gap between events (in milliseconds).
- Create the Event Handler: Double-click on the Timer control in the designer view. This will automatically create a Tick event handler function in your code.
- Write Event Handler Code: Inside the Tick event handler function, write the code you want to execute repeatedly. This could be updating a label with the current time, simulating game logic, or any other task that requires periodic execution.
How to Timer Control ?
The Timer Control offers precise program control at various time intervals, ranging from milliseconds to hours. It grants us the ability to configure the Interval property, which operates in milliseconds (where 1 second equals 1000 milliseconds). For instance, if we desire an interval of two minutes, we can set the Interval property value to 120000, which represents 120 multiplied by 1000.
The Timer Control starts its functioning only after its Enabled property is set to True, by default Enabled property is False.

Timer example
The following program provides an example of utilizing a Timer to display the current system time in a Label control. To accomplish this, we require a Label control and a Timer Control. In this program, we observe that the Label Control is updated every second since we set the Timer Interval to 1 second, equivalent to 1000 milliseconds. To implement this functionality, we begin by dragging and dropping the Timer Control onto the designer form. Next, we double-click the Timer control and set the Label control's Text property to the value of DateTime.Now.ToString(). This ensures that the Label control reflects the current system time accurately.
Start and Stop Timer Control
The Timer Control Object provides us with the flexibility to determine when it should start and stop its operations. It offers convenient start and stop methods that allow us to initiate and halt its functionality as needed. By invoking the start method, we trigger the Timer Control to commence its operations and execute the designated tasks based on the specified interval. Conversely, by invoking the stop method, we instruct the Timer Control to cease its operations and halt the execution of associated actions. These start and stop methods offer precise control over the timing and duration of the Timer Control's function within our applications.

Here is an example that demonstrates the usage of start and stop methods with the Timer Control. In this particular scenario, we want the program to run for a duration of 10 seconds. To achieve this, we start the Timer in the Form_Load event and subsequently stop it after 10 seconds have elapsed. The Timer's Interval property is set to 1000 milliseconds (1 second), causing the Timer to trigger its Tick event every second during runtime. As a result, the Timer will execute its Tick event 10 times, aligning with the desired 10-second runtime duration.
Full Source VB.NETTimer Control Properties
Methods of Timer Control
Conclusion
The Timer Control serves as a fundamental component in both client-side and server-side programming, as well as its utilization in Windows Services. It empowers developers to control the timing of actions and events without the need for external thread interaction, enhancing the performance, interactivity, and reliability of applications in various contexts.
- Visual Studio IDE
- How to Create a VB.Net Windows Forms Application
- Label Control | VB.Net
- VB.Net Button Control
- VB.Net TextBox Control
- VB.Net ComboBox Control
- VB.Net ListBox Control
- VB.Net Checked ListBox Control
- VB.Net RadioButton Control
- VB.Net CheckBox Control
- VB.Net PictureBox Control
- VB.Net ProgressBar Control
- VB.Net ScrollBars Control
- VB.Net DateTimePicker Control
- VB.Net Treeview Control
- VB.Net ListView Control
- VB.Net Menu Control
- VB.Net MDI Form
- VB.Net Color Dialog Box
- VB.Net Font Dialog Box
- VB.Net OpenFile Dialog Box
- VB.Net Print Dialog Box
- KeyPress event in VB.NET
- How to create Dynamic Controls in VB.NET ?
- How do i keep a form on top of others