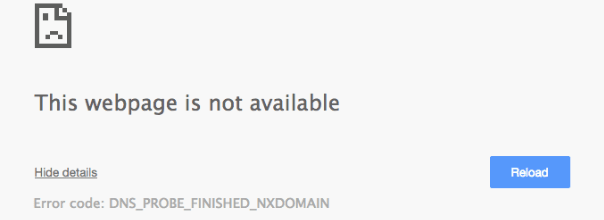
How to fix DNS_PROBE_FINISHED_NXDOMAIN
The "DNS_PROBE_FINISHED_NXDOMAIN" error is specifically linked to the DNS server, which is responsible for translating domain names into their corresponding IP addresses and vice versa. When a domain name cannot be resolved using the DNS, the condition known as NXDOMAIN arises, indicating a non-existent Internet or Intranet domain name. This error can occur on various devices and is dependent on the type of web browsers being used, leading to different variations of the error message. If encountered, it suggests that there may be an issue with the DNS service either on your end or the server's side, and troubleshooting steps such as checking the domain name resolution, verifying DNS settings, and potentially changing DNS servers can help resolve the error and restore proper Internet connectivity.
DNS errors are typically manageable by users themselves. By following a series of general steps, users can quickly resolve these prolonged errors. Some effective solutions include switching to Google DNS or OpenDNS servers, and clearing cookies and cached files from the browser. Similar to other types of errors, users have the capability to troubleshoot and resolve DNS issues independently, ensuring a smoother browsing experience.
- Release or Renew Your IP Address
- Change DNS server
- Restart DNS Client service
- Reset hosts file
- Reset Chrome Flags
- Reset Winsock program
Release or Renew Your IP Address
To rectify this error on your computer, one straightforward approach is to release or renew your IP address. This method is relatively simple and can be accomplished independently by following the step-by-step instructions provided below. By executing this procedure, you can effectively resolve the issue and restore proper network connectivity.
- Open Command Prompt (CMD) on your Computer by just Win + R Key. Then type CMD in the box and hit enter.
- Type and enter ipconfig /release
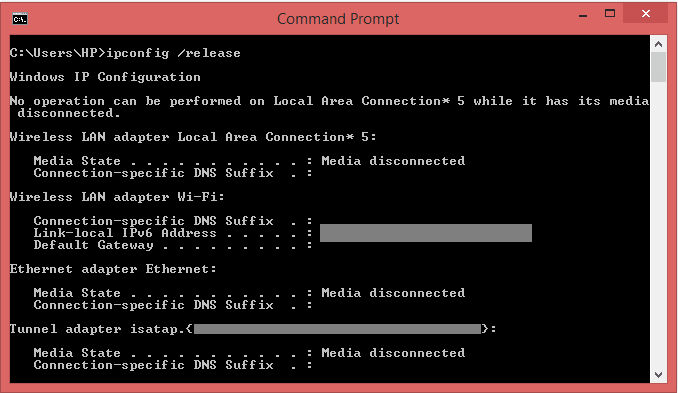
Upon executing the command to release or renew the IP address, all currently connected network adapters on the computer will initiate the process of renewing their addresses with the DHCP server. It is essential to wait for the command to complete its task. During this period, you will observe that the IP address line displays 0.0.0.0, which is a normal occurrence as the command releases the IP address from the network adapter. Consequently, your computer will temporarily have no assigned IP address, resulting in a lack of internet access. It is crucial to be patient during this phase, as once the IP addresses are successfully renewed, internet connectivity will be restored.

- Type ipconfig /renew at the prompt window, press Enter, wait for a while, the DHCP server will assign a new IP address for your computer.
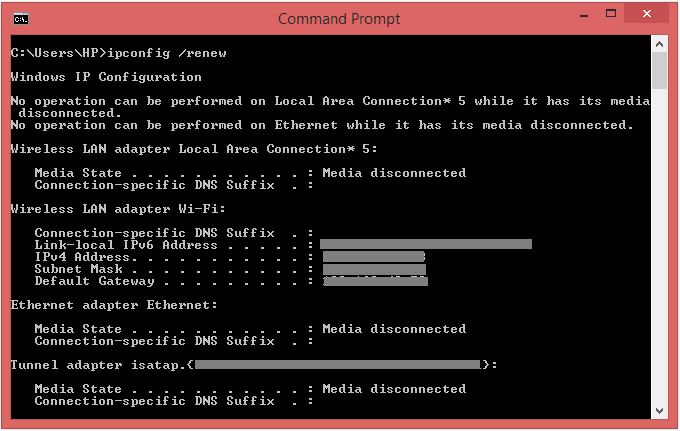
Upon executing this command, all connected network adapters will have their IP addresses released. It is important to wait for the command to complete, and you will notice a new line appearing at the bottom of the Command Prompt screen. Once the process is finished, close the Command Prompt and proceed to reopen your web browser. This action will allow your system to obtain fresh IP addresses from the DHCP server and potentially resolve any connectivity issues you were experiencing.
Change DNS server
To modify the existing DNS settings through the networking settings on Control Panel, follow these general steps. Keep in mind that the instructions may vary depending on the version of your operating system. The example provided here is for one version, but for specific instructions tailored to your operating system/version, it is advisable to refer to your vendor's documentation.
- Open Control Panel.
- Click on Network and Internet.
- Click on Network and Sharing Center.
- Click the Change adapter settings option in the left pane.
- Right-click the network connection and select "Properties".
- Select "Internet Protocol Version 4 (TCIP/IPv4)" and click "Properties".
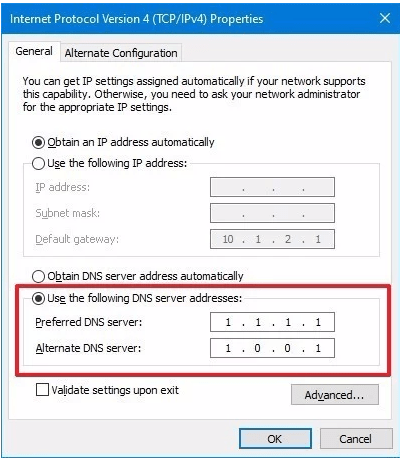
To configure a custom DNS server for IPv6 connections, follow these steps:
- Select "Internet Protocol Version 6 (TCP/IP/IPv6)" from the network adapter properties.
- Click on the "Properties" button.
- Enter the desired IPv6 addresses for the custom DNS servers.
- Click "OK" to save the changes when you have finished.
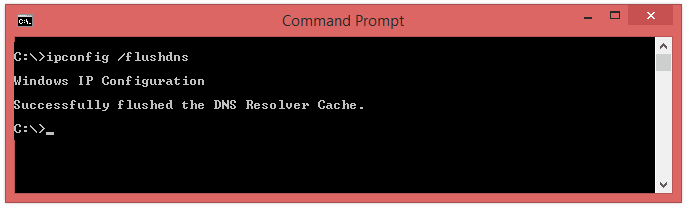
Flush DNS cache
After changing your DNS server on a Windows PC, it is advisable to flush the DNS cache to ensure that Windows is utilizing the updated DNS records from the new DNS server instead of relying on cached results from the previous server. Flushing the DNS cache helps in obtaining the most current and accurate information for domain name resolutions, improving the overall browsing experience and avoiding any potential issues with outdated DNS data.
Restart DNS Client service
When you create a DNS server on a Windows machine, DNS runs as a service on the computer. The DNS service can be restarted using the Windows command line .
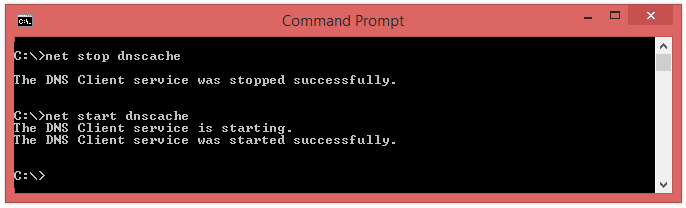
- Open Command Prompt (CMD) on your Computer by just Win + R Key. Then type CMD in the box and hit enter.
- Type "net stop dnscache" to stop the service. It may take a few seconds for the service to stop.
- Type "net start dnscache" into the command prompt and press Enter. This will restarts the DNS service on the machine. You can test the restart by opening a Web browser and entering a domain into the navigation text box. If the domain displays successfully, your DNS is working properly.
Reset hosts file
The Hosts file serves as an essential component in the operating system, facilitating the mapping of user-friendly hostnames to corresponding numerical IP addresses, enabling effective host identification and location in an IP network. In the event that modifications have been made to the HOSTS file on Windows, resetting it to its default state can prove beneficial. Resetting the Hosts file can assist in resolving various connectivity issues that may arise due to alterations made to this critical system file, ensuring smoother network communication and accurate hostname-to-IP address mapping.
The Hosts file in Windows 10/8/7 is located at the following location:
C:\Windows\System32\drivers\etc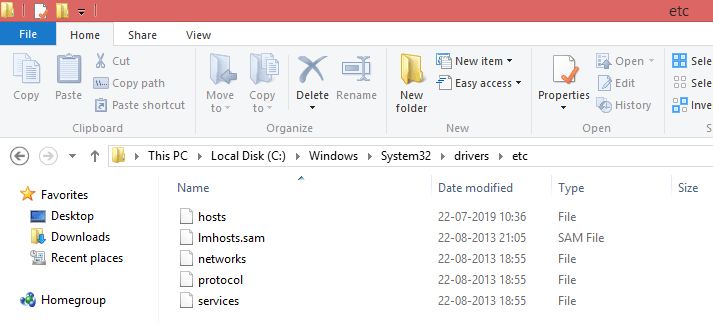
Double check and make sure the website you're trying to visit isn't listed in there. If it is, remove it.
How to Reset Hosts File Back to Default?
Rename the Hosts file to hosts.bak . You may be required to take ownership of the file first.
In order to create a new default Hosts file. To do so, open a new Text file named "hosts" in the folder C:\Windows\System32\drivers\etc .
Copy-paste the following text into the notepad file :
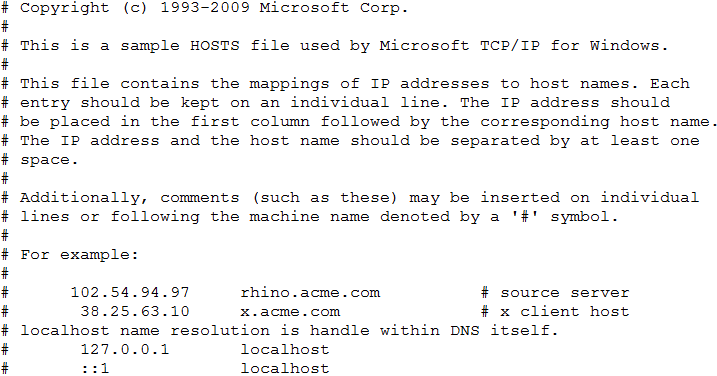
Click on the File menu and Save. Now you've successfully reset the HOSTS file back to default in Windows 10 . For Windows 8/7/Vista, the contents of the HOSTS file are different and you can copy them from Microsoft's website .
Reset Chrome Flags
Google Chrome offers experimental features that are typically disabled by default. However, in certain rare instances, an experimental feature may be enabled, but this usually occurs when the feature has reached a high level of stability. Users have the flexibility to customize various settings and can easily revert an experimental feature back to its default state, providing a seamless and reversible experience for trying out new functionalities and optimizations in the browser.
- Type "chrome://flags/" in the address bar.
- You will find a page with all experimental Chrome features available for your PC.
- Click on "Reset all to default" button on the upper right corner.

After that, close and reopen Chrome.
Reset Winsock program
The DNS_PROBE_FINISHED_NXDOMAIN error can occur if your computer's IP settings are improperly configured or become corrupted. To address this issue, it is essential to ensure proper IP configuration and integrity. However, before attempting any corrective methods, it is advisable to create a system restore point to safeguard against potential complications and provide a way to revert back to a stable system state if needed. Creating a system restore point serves as a precautionary measure to protect your system and data during the troubleshooting process.
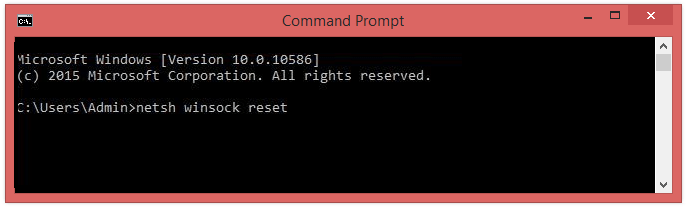
- Click the Search icon (magnifying glass) in the bottom left-hand corner of the screen and type "cmd" into the search bar.
- You'll see the Command Prompt app as the best match at the top of the list. Right-click on it and select Run as administrator. Depending on your computer settings, you may be asked to provide an administrator password before you can continue.
- On command prompt Type “"netsh winsock reset" and then hit the Enter key on your keyboard.
DNS_PROBE_FINISHED_NXDOMAIN in Android

- Go to Settings and open Wi-Fi.
- Press and hold on the network you are connected to at the moment.
- Click the Modify Network option.
- Go to more advanced options by selecting the “Show advanced options” box.
- Select the Static option that is presented adjacent to the IP settings.
- This is an optional step, in the sections of DNS1 and DNS2, type in the DNS IP addresses.
- change DNS settings to 8.8.8.8 and the second DNS option to 8.8.4.4.
Conclusion
The DNS_PROBE_FINISHED_NXDOMAIN error occurs when a computer's IP settings are misconfigured or corrupted, resulting in the inability to resolve a domain name. This error can be resolved by ensuring proper IP configuration and integrity, and it is recommended to create a system restore point before attempting any corrective methods as a precautionary measure.
- How to Print Screen
- How to View Hidden Files in Windows 11, 10, 8 and 7
- Fahrenheit to Celsius Temperatire Conversion Formula
- How to zip files - Compress and uncompress files
- How to Use Robocopy
- How to WMIC ?
- How to recover deleted files
- Microsoft Outlook POP3 Settings, Microsoft Outlook IMAP Settings
- How to Update Windows 11
- What is Three-Tier Architecture ?
- What Is an API (Application Program Interface) ?
- Differences Between HTML4 And HTML5
- How to choose the best antivirus software
- How to Embed a YouTube Video in Your Website
- what is the difference between x64 and x86
- Learn Multiplication of Tables
- What is a Proxy Server?
- How to use a Google Android phone as a Wi-Fi hotspot
- How to automatically redirect a Web Page to another URL
- How to Download YouTube Videos
- What is a Phishing Attack ? How can I avoid them?
- What is a Call To Action?
- What's the Difference Between JPG and PNG?
- What Is a "500 Internal Server Error" and How Do I Fix It?
- What is the difference between OTF and TTF fonts
- How to enable flash player on chrome
- How to Select a Video Editing Software
- Why am I getting a "Your connection is not private error" in Chrome
- How to block "Deceptive site ahead" security error?
- Crypto for beginners: What is cryptocurrency?
- What is Bitcoin and how does it work?
- How to fix HTTP Error 502 Bad gateway
- GET url returns "data:text/html,chromewebdata"
- Chrome:Your Clock Is Ahead / Your Clock Is Behind Error
- How to fix ERR_UNKNOWN_URL_SCHEME
- SSL Error on Port 443
- How to Fix This Site Can't Be Reached Error in Chrome
- A disk read error occurred, Press Ctrl+Alt+Del to restart
- How to use System Restore on Windows 10
- What is HTTP error 503 and how do you fix it?
- How to get help in Windows 10
- How To Disable Windows 10 Forced Updates
- How to Fix Google Chrome Error - ERR_SSL_PROTOCOL_ERROR
- How to reset windows 10 password
- What is Blockchain?
- How To Fix: ERR_PROXY_CONNECTION_FAILED
- Unable to send mail through smtp.gmail.com
- How to use GTMetrix to Speed up Your Website?
- How to fix System Thread Exception Not Handled Error
- How to fix ERR_INTERNET_DISCONNECTED Error
- WiFi Connected But No Internet Access – How to Fix?
- How to fix a HTTP Error 400: Bad Request?
- What is Deprecation
- How to Fix a 403 Forbidden Error
- What is the maximum length of a URL in different browsers?
- SSL Certificate Problem: Unable to get Local Issuer Certificate
- How to Fix the ERR_CONNECTION_TIMED_OUT Error
- What does localhost:8080 mean?
- How to reduce initial server response time
- 414 Request-URI Too Long - HTTP
- Message channel closed before a response was received