This site can't be reached Error
Every time you use the Chrome browser and you happen to run into the "This site can't be reached" page, it is the most usual thing to experience. Numerous users may end up being victimized by this error without knowing how to escape this. Multiple reasons may be behind the manifestation of this error in the Chrome platform, which might impact a user's access to a website.
Most of the time, the "This site can't be reached" error arises due to the DNS lookup problem, in which the router can't obtain the website name and it invariably fails. The reasons for the error being encountered vary and they include slow or no internet connection, misconfigured internet or network settings or firewall restrictions that can prevent Chrome from displaying the web page. While encountering this problem, users may receive a related error code, and it occurs when depicting the cause of the issue. As soon as fixing or bothering with available issues and finding the root reasons, the desired sites can be restored to Chrome browser.
- DNS_PROBE_FINISHED_NXDOMAIN
Or
- ERR_CONNECTION_TIMED_OUT
The "This site can't be reached" error message may be encountered on several operating systems, such as Windows 7, Windows 8.1, and Windows 10, Linux, Chrome OS, as well as Android devices. Whether the underlying cause to this problem is natural or man-made, the answer is still to find a lasting solution to fix this situation. However, listed below are certain solutions that would do the job, thereby making the Internet fully accessible: However, these solutions can bring the problem to an end and let users use the Internet without any distractions.
- Clear browser cache, history and cookies
- Reset Chrome browser settings
- Reset Wi-Fi Modem
- Restart DNS client
- Change IPv4 DNS Address
- Disable "Experimental QUIC protocol" flag
- Changing maximum allowed TLS version
- Reset the Chrome profile Sync
- Remove browser extension from Chrome
- Reset TCP/IP
- Scan your device for malware
- Reinstall Chrome
- Install another web browser
Clear browser cache, history and cookies
- Open Chrome browser.
- At the top right, click More icon.
- Click "More tools" -> Clear browsing data .
- At the top, choose a time range. To delete everything, select All time.
- Next to "Cookies and other site data" and "Cached images and files," check the boxes.
- Click Clear data.
Reset Chrome settings
This is made possible through the Chrome browser, where users get an effective way of resetting their settings to the default ones with just one click of their mouse. Selecting the reset option will wipe your browser clean. That means everything will be removed including your home page, saved tab assignments, filled-in form information, browsing history, and cookies. This feature can be effective in the scenarios where users have some problems with their browser, or the case if they wish to plant the settings back to the default conditions. Nevertheless, the utilization of the new instance will cause the loss of your personal data and the preferences which were set.
- Open Chrome browser.
- At the top right, click More icon.
- Select Settings from menu option.
- At the bottom, click Advanced.
- Under Reset and cleanup click Reset Settings and then Reset Settings.
Reset Wi-Fi Modem
You can easily reset your wi-fi modem manually. If you have a separate router, you should reset it as well.
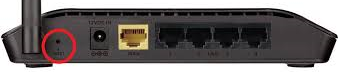
- Unplug the power cord from the WiFi router.
- Press and hold the reset button 10 to 15 seconds.
- Release the reset button after the lights on the modem start flickering.
- Wait 3 to 5 minutes for the Internet light to turn green.
- Try connecting to the Internet.
- You may be asked for account related information to reset your modem.
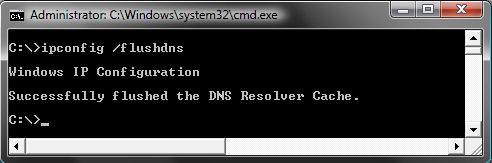
Restart DNS client
- Click the Windows "Start" button and select "Run."
- Enter "cmd" into the text box and press "Enter."
- This starts your Windows command prompt.
- Type net stop dnscache to stop the service.
- It may take a few seconds for the DNS service to stop.
- Type net start dnscache to the command prompt and "Enter."
- This restarts the DNS service on the machine.

- To reset the DNS cache and remove all entries from it, run the following command: ipconfig /flushdns.
- If everything went well, the result should be "Successfully flushed the DNS Resolver Cache".
Change IPv4 DNS Address
- Open Control Panel.
- Click View network status and tasks.
- Click Change adapter settings on the left portion of the Window.
- Double-click the icon for the Internet connection you're using.
- Click and highlight Internet Protocol Version 4 (TCP/IPv4) and click Properties.
- Enter the new DNS addresses.
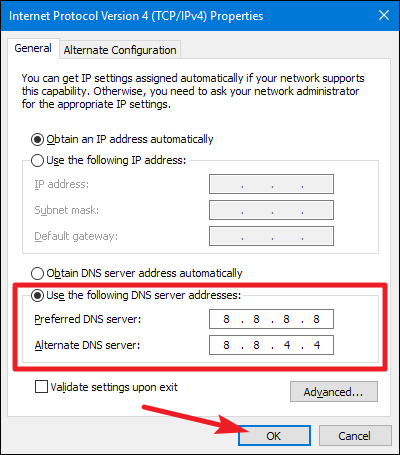
Enter this Google public DNS server address:
- Prefered DNS Server: 8.8.8.8
- Alternate DNS Server: 8.8.4.4
Tick on Validate settings upon exit. Then click OK.
Disable "Experimental QUIC protocol" flag
The purpose of the QUIC protocol is to improve transport performance over TCP for internet traffic. QUIC utilizes UDP ports 80 and 443, and in some cases, UTM (i.e., Unified Threat Management) features may not be able to function correctly, such as the web filtering specifically on Google Chrome if the clients bypass any transparent proxies. Nevertheless, other browsers like Internet Explorer and Mozilla Firefox, for example, might not have these problems. To disable the QUIC protocol in the Google Chrome internet browser, follow these steps:
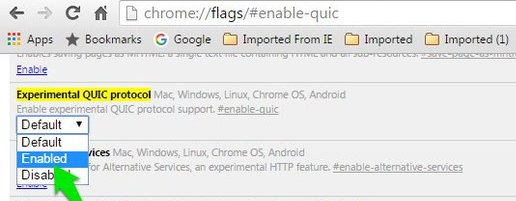
- Open chrome and type chrome://flags/ in the address bar.
- Search the Experimental QUIC protocol.
- Change "Default" to "Disabled" option from the drop-down menu.
- Restart Google Chrome for your changes to take effect.
Changing maximum allowed TLS version
The server that presents the website may be an old version of TLS which is one of the possible reasons for the problem to arise. Transport Security Layer (TLS) is a cryptographic protocol used for creating unspoiled transmission of information across networks of computers. Currently, the version that is wildly distributed is TLS 1.2 and TLS 1.3 is already available as the final version while offering enhanced security improvements. Old TLS version may as well lead to necessary software update and, in turn, the error might be also situationally generated in the browser. Enabling the TLS version on web server to the latest stable version (TLS 1.2 or TLS 1.3) is recommended, so that there are no errors of communication, while dealing with remote devices like browsers.
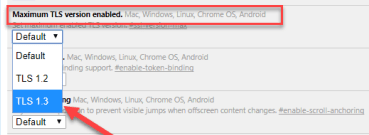
- Open chrome and type chrome://flags/ in the address bar.
- Search Maximum TLS version enabled.
- Select the version 1.3 which is set to Default before.
- Restart Google Chrome for your changes to take effect.
Reset the Google Chrome Profile Sync
Google offers a site that displays every item category you have in sync with Chrome. It is important to clean this synchronized cache.
- On your computer, open Chrome.
- Go to the Google Dashboard.
- At the bottom, click Reset sync.
- Confirm by clicking OK.
- Turn sync on again.
Remove Browser Extension from Chrome
All Internet browsers allow for the use of extensions, which are small programs that extend the functionality of a browser. Some browser extensions are known to interrupt network connections.
- Open Chrome browser.
- At the top right, click More icon.
- Select More tools from the menu.
- Select Extensions from the side menu.
- Drag the blue slider to disable the extension one by one.
- Confirm if a browser extension is responsible for the particular error and remove it.
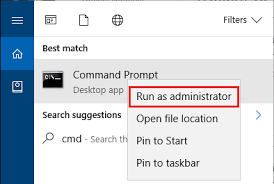
Reset TCP/IP
Type "cmd" in the search box, then right-click on CommandPrompt to select "Run as Admintrator". Depending on your computer settings, you may be asked to provide an administrator password before you can continue.
- At the command Prompt Type netsh int ip reset and then hit the Enter key on your keyboard.
- Wait for the Command Prompt to run through the TCP/IP reset.
- Reboot your computer and go to the website again to see if it works.
Reinstall Network Adapter Drivers
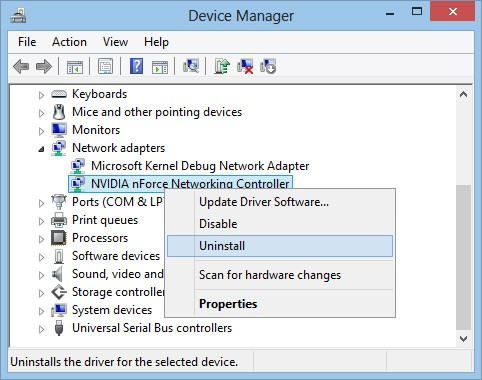
- Go to the icon of 'My Computer' and right click to select Manage.
- There click on Device Manager that will bring you a list of all the hardware installed.
- Now look for the Network adapters and expand it.
- Right-click the network connection you are using and select Uninstall.
- Restart your PC, and the drivers will get installed automatically, then try open website again.
Scan your device for Malware
Malicious software which might be currently present on your machine might be the cause of disruption of your network connections. Thus, some kinds of software create proxy servers that could only be detected after the fact and the redirected visitor traffic would be transparently transferred to the malicious server to get the criminal activities running. As a result, such devastating software becomes the primary driving force behind the "This site can't be reached" error that repeatedly pops up in the Google Chrome browser. With that being said, it is vital for you to start acting now and to demolish this security issue to ensure your system and thus internet connection are not interrupted.
Reinstall Chrome
- Go to Control Panel and click Uninstall a program and uninstall Google Chrome from your PC.
- Navigate to C:\Users\%your_name%\AppData\Local\Google\ and delete everything inside this folder.
- Download the latest version of Chrome Browser and install it.
- Restart your PC, and try open website again.
Conclusion
The error massage "This site can't be reached" is usually encountered in the Google Chrome browser and shows that the target site is not online or is experiencing problems while connecting. This could be caused by several factors such as, client network failures, server crashes or malicious software messing with network connectivity.
- How to Print Screen
- How to View Hidden Files in Windows 11, 10, 8 and 7
- Fahrenheit to Celsius Temperatire Conversion Formula
- How to zip files - Compress and uncompress files
- How to Use Robocopy
- How to WMIC ?
- How to recover deleted files
- Microsoft Outlook POP3 Settings, Microsoft Outlook IMAP Settings
- How to Update Windows 11
- What is Three-Tier Architecture ?
- What Is an API (Application Program Interface) ?
- Differences Between HTML4 And HTML5
- How to choose the best antivirus software
- How to Embed a YouTube Video in Your Website
- what is the difference between x64 and x86
- Learn Multiplication of Tables
- What is a Proxy Server?
- How to use a Google Android phone as a Wi-Fi hotspot
- How to automatically redirect a Web Page to another URL
- How to Download YouTube Videos
- What is a Phishing Attack ? How can I avoid them?
- What is a Call To Action?
- What's the Difference Between JPG and PNG?
- What Is a "500 Internal Server Error" and How Do I Fix It?
- What is the difference between OTF and TTF fonts
- How to enable flash player on chrome
- How to Select a Video Editing Software
- Why am I getting a "Your connection is not private error" in Chrome
- How to block "Deceptive site ahead" security error?
- Crypto for beginners: What is cryptocurrency?
- What is Bitcoin and how does it work?
- How to fix HTTP Error 502 Bad gateway
- GET url returns "data:text/html,chromewebdata"
- Chrome:Your Clock Is Ahead / Your Clock Is Behind Error
- How to fix ERR_UNKNOWN_URL_SCHEME
- SSL Error on Port 443
- A disk read error occurred, Press Ctrl+Alt+Del to restart
- How to use System Restore on Windows 10
- What is HTTP error 503 and how do you fix it?
- How to get help in Windows 10
- How To Disable Windows 10 Forced Updates
- How to Fix Google Chrome Error - ERR_SSL_PROTOCOL_ERROR
- How to reset windows 10 password
- What is Blockchain?
- How To Fix: ERR_PROXY_CONNECTION_FAILED
- Unable to send mail through smtp.gmail.com
- How to fix DNS_PROBE_FINISHED_NXDOMAIN
- How to use GTMetrix to Speed up Your Website?
- How to fix System Thread Exception Not Handled Error
- How to fix ERR_INTERNET_DISCONNECTED Error
- WiFi Connected But No Internet Access – How to Fix?
- How to fix a HTTP Error 400: Bad Request?
- What is Deprecation
- How to Fix a 403 Forbidden Error
- What is the maximum length of a URL in different browsers?
- SSL Certificate Problem: Unable to get Local Issuer Certificate
- How to Fix the ERR_CONNECTION_TIMED_OUT Error
- What does localhost:8080 mean?
- How to reduce initial server response time
- 414 Request-URI Too Long - HTTP
- Message channel closed before a response was received